Start Learning First Aid Skills Within The Cadets
First Aid is the immediate help given to someone who is ill or injured. Think for a moment, if you were ill or injured wouldn’t you want someone to stop help and you? First aid skills are easy to learn and with regular practice and knowledge you gain from Cadets, it can be of benefit through-out your whole life, to you, your family members and friends.
Please note that first aid is not an exact science and often casualties do not respond in a way you hope they will and of course the outcomes of a casualty are not always successful, so don’t be afraid to talk things through with someone if you have been affected by giving first aid treatment.
As a junior cadet, you have access to gaining the nationally recognized Youth First Aid qualification which is valid for three years, approved by HQ Air Cadets, a special center of St John Ambulance. A senior cadet aged over 14 can undertake the adult first aid qualification Activity First Aid, progressing from aged 16 years to the Health & Safety Executive recognized First Aid at Work certificate.
Remember DO NO HARM.
ASSESSING THE SITUATION (AMEGR)
As a first aider when you come across a situation you must act quickly, but calmly to
Assess the situation. After finding out what happened you must remove any hazards or dangers to
Make the Area Safe, ensure you do not become a casualty. Then approach the casualty to see if they are conscious and decide to give the appropriate
Emergency Aid treatment. Once you have got the facts,
Get Help, lastly
Report what has happened to your squadron staff, they may be able to help you. You may need to clear up the squadron area, stock up your first aid kit, then brew up after all your hard work and efforts!
ASSESSING THE SCENE/SITUATION
When approaching any casualty your first priority should always be your own safety. Failure to observe this rule could easily lead to you becoming a casualty.
If you identify a hazard to either yourself or the casualty you may be able to safely remove the hazard or alternatively remove the casualty from the hazard allowing assessment to be continued in a safer location. Every situation and scene is different but you may wish to consider the following hazards:
- Electricity
- Water
- Vehicles
- Falling objects
- Sharps e.g. Glass, knives, needles
- Aggression from a frightened casualty or bystander
- Animals
- Chemicals, if you suspect any chemicals DO NOT APPROACH. Offer advice to the casualty from a safe distance and await specialist help.
PRIMARY SURVEY
After establishing the scene is safe, the first step in every casualty assessment is the primary survey. The purpose of the primary survey is to rapidly identify immediately life-threatening injuries or conditions and manage them accordingly as they are found, for example, you do not check breathing before opening the airway.
The casualty should be reassessed on a regular basis using RCEHAB. Although this may seem excessive for the majority of casualties with minor injuries it is good practice and guarantees things won’t be missed. In a critically ill or injured casualty, you might not get beyond the primary survey in the time you are with the casualty.
The sequence is as follows:
- Response
- Catastrophic External Haemorrhage
- Airway
- Breathing
Response
Is the casualty conscious?
Are they talking to you?
Ask them to open their eyes.
You may need to stimulate a response by gently shaking them by the shoulder.
This should take only a second or two.
Do not delay moving on through the primary survey if you do not get a response.
CATASTROPHIC EXTERNAL HAEMORRHAGE
Identifying and stopping a catastrophic hemorrhage is the first step in the primary survey, it is immediately life-threatening if not controlled.
Recognition
Uncontrollable bleeding, often spurting or pumping a large amount of blood lost in a short time
Causes
- Deep lacerations
- Traumatic amputations i.e. from blast injuries
- Stab wounds
- Gunshot wounds
Actions
Apply very firm pressure directly to the site of bleeding using a clean dressing if available. If bleeding from a limb is uncontrollable, apply a tourniquet if one is available and you are trained in its use.
If you can elevate the limb do so, this will assist in slowing the bleeding. In extreme circumstances, tourniquets have been improvised using clothing and other objects but they are less likely to be effective.
First Aid Assistance
Precautions
- Do not remove embedded objects
- If blood soaks through a dressing apply another dressing on top, never remove the bottom dressing as it could encourage further bleeding
- Wounds may appear small but can still bleed severely
AIRWAY
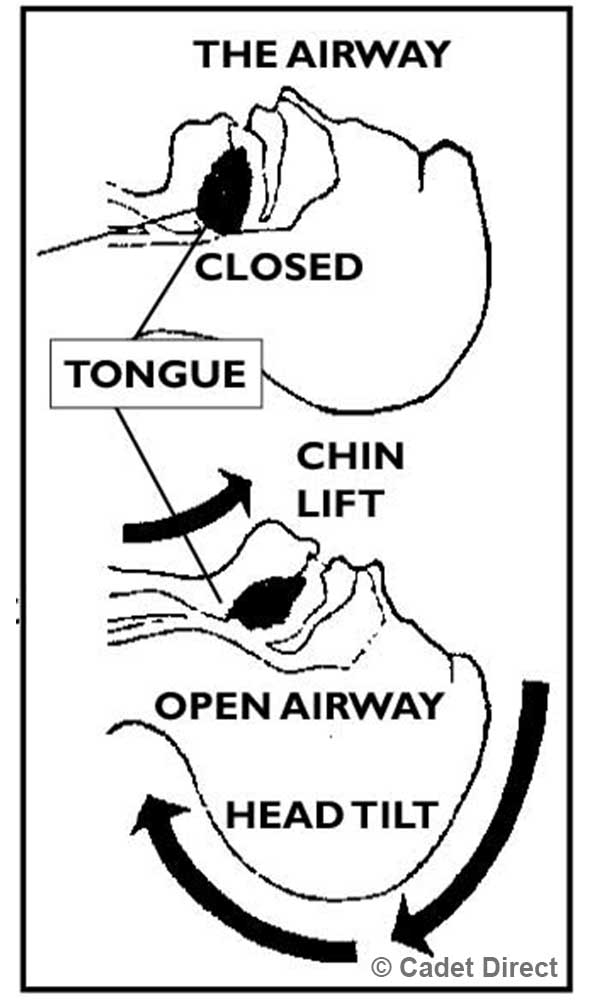
The second step in the primary survey is to open the casualty’s airwa
Action
- Head Tilt and Chin Lift Method: Using one hand on the head and the other under the point of the chin tilt the casualty’s head back, keep the airway open in this position and move on to checking to breathe
Precautions
- In incidents involving high mechanism trauma, such as road traffic collisions you may feel afraid to move the casualty and other bystanders might instruct you not to because of possible neck/ back injuries. Remember, spinal injuries are very uncommon and unless the casualty’s airway is opened they have no chance of survival.
Action
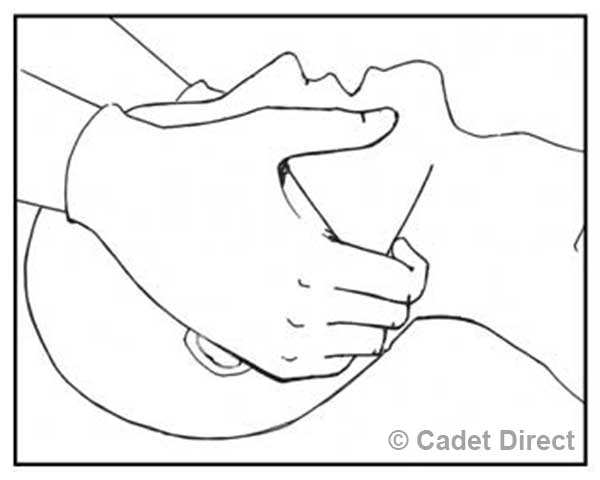
- Jaw-Thrust Method: Only used the Jaw-Thrust method when a victim has a possible spinal injury because it can be accomplished without extending the neck. Grasp the angles of the victim’s lower jaw and lift with both hands, one on each side, displacing the jaw forward and up. Your elbows should rest on the surface where the victim is lying. If the lips close, the lower lip can be opened with your thumb. If mouth-to-mouth is necessary, close the nostrils by placing your cheek against them. The victim's head should be carefully supported without tilting it backward or turning it from side to side. If this is unsuccessful, the head should be tilted back very slightly.
BREATHING
Look, listen and feel for normal breathing.
Action
- Look for chest movement
- Listen for breath sounds
- Feel for air on your cheek
- If the casualty is breathing normally place him in the recovery position
- If the casualty is not breathing normally, summon help and begin CPR
Look listen and feel for no more than 10 seconds. If you unsure if the casualty is breathing normally, treat as if they are not.
Precautions
- In the first few minutes of cardiac arrest (when the heart has stopped beating) the casualty may take occasional, noisy breaths or appear to be gasping. This is known as agonal breathing and is not normal breathing.
RECOVERY POSITION
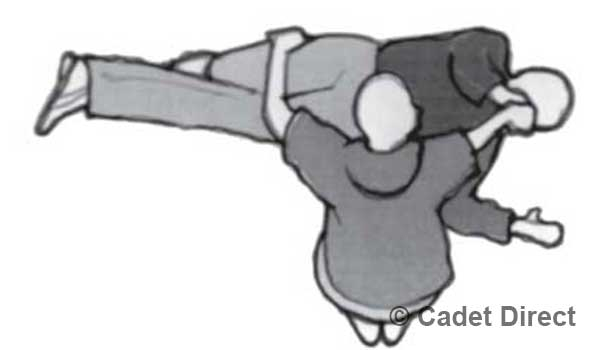
The purpose of the recovery position is to maintain an open airway and allow drainage of blood, fluid or vomit from the mouth and nose in an unconscious, breathing casualty.

Recovery Position
Action
- Kneeling beside the casualty, place the arm nearest to you at right angles to the casualty’s body with the elbow bent and the palm facing upwards.
-
Bring the other arm across the body and hold the back of the casualty’s hand against the cheek closest to you.
-
With your other hand lift the casualty’s far leg above the knee so his foot is flat on the floor.
-
Roll the casualty towards you so the casualty is on their side, tilt the head back to ensure the airway remains open.
Precautions
- If you find getting the casualty into the recovery position difficult, remember that the objective is to get the casualty onto their side and maintain an open airway. This is possible by just rolling the casualty towards you and holding them in position, remember the casualty cannot be left alone this way.
BASIC LIFE SUPPORT
If during your primary survey you identify the casualty as unresponsive and not breathing normally they should be treated for cardiac arrest. This is known as basic life support, or more commonly, Cardio Pulmonary Resuscitation (CPR).
Adult basic life support sequence Basic life support consists of the following sequence of actions:
1. Make sure the victim, any bystanders, and you are safe.
2. Check the victim for a response.
- Gently shake his shoulders and ask loudly, ‘Are you all right?’
3A. If he responds:
- Leave him in the position in which you find him provided there is no further danger.
- Try to find out what is wrong with him and get help if needed.
- Reassess him regularly.
3B. If he does not respond:
- Shout for help.
- Turn the victim onto his back and then open the airway using head tilt and chin lift:
- Place your hand on his forehead and gently tilt his head back.
- With your fingertips under the point of the victim’s chin, lift the chin to open the airway.
- If spinal injury is suspected use Jaw-Thrust method, if necessary (see page 3-4).
4. Keeping the airway open, look, listen, and feel for normal breathing.
- Look for chest movement.
- Listen at the victim’s mouth for breath sounds.
- Feel for air on your cheek. In the first few minutes after cardiac arrest, a victim may be barely breathing, or taking infrequent, noisy, gasps. This is often termed agonal breathing and must not be confused with normal breathing.
Look, listen, and feel for no more than 10 seconds to determine if the victim is breathing normally. If you have any doubt whether breathing is normal, act as if it is not normal.
5A. If he is breathing normally:
- Turn him into the recovery position.
- Summon help from the ambulance service by mobile phone, or by any means possible. If this is not possible, send a bystander for help. Leave the victim only if no other way of obtaining help is possible.
- Continue to assess that breathing remains normal. If there is any doubt about the presence of normal breathing, start CPR (5B).
5B. If he is not breathing normally:
- Ask someone to call for an ambulance and bring an AED if available. If you are on your own, use your mobile phone to call for an ambulance. Leave the victim only when no other option exists for getting help.
START CHEST COMPRESSION AS FOLLOWS:
- Kneel by the side of the victim.
- Place the heel of one hand in the center of the victim’s chest (which is the lower half of the victim’s sternum (breastbone)).
- Place the heel of your other hand on top of the first hand.
- Interlock the fingers of your hands and ensure that pressure is not applied over the victim’s ribs. Do not apply any pressure over the upper abdomen or the bottom end of the sternum.
- Position yourself vertically above the victim’s chest and, with your arms straight, press down on the sternum 5 - 6 cm.
- After each compression, release all the pressure on the chest without losing contact between your hands and the sternum. Repeat at a rate of 100 - 120 min-1.
- Compression and release should take an equal amount of time. Another easy method for finding the correct spot is to find the bottom of the sternum and go two finger widths up, place the palm of your other hand next to these fingers then interlock the fingers. The amount that you press on someone's chest varies with there size, a rule of thumb is its acceptable to compress up to one-third of the body depth.
6A. Combine chest compression with rescue breaths:
- After 30 compressions open the airway again using head tilt and chin lift.
- Pinch the soft part of the victim’s nose closed, using the index finger and thumb of your hand on his forehead.
- Allow his mouth to open, but maintain chin lift.
- Take a normal breath and place your lips around his mouth, making sure that you have a good seal.
- Blow steadily into his mouth whilst watching for his chest to rise; take about one second to make his chest rise as in normal breathing; this is an effective rescue breath.
- Maintaining head tilt and chin lift, take your mouth away from the victim and watch for his chest to fall as air comes out.
- Take another normal breath and blow into the victim’s mouth once more to give a total of two effective rescue breaths. The two breaths should not take more than 5 seconds. Then return your hands without delay to the correct position on the sternum and give a further 30 chest compressions.
- Continue with chest compressions and rescue breaths in a ratio of 30:2.
- Stop to recheck the victim only if he starts to show signs of life e.g. breathes normally, regaining consciousness, such as coughing, opening his eyes, speaking, or moving purposefully, otherwise do not interrupt resuscitation.
If the initial rescue breath of each sequence does not make the chest rise as in normal breathing, then, before your next attempt:
Check the victim’s mouth and remove any visible obstruction.
- Recheck that there is adequate head tilt and chin lift.
- Do not attempt more than two breaths each time before returning to chest compressions. If there is more than one rescuer present, another should take over CPR about every 1-2 min to prevent fatigue. Ensure the minimum of delay during the changeover of rescuers, and do not interrupt chest compressions.
If there is more than one rescuer present, another should take over CPR about every 1-2 min to prevent fatigue. Ensure the minimum of delay during the changeover of rescuers, and do not interrupt chest compressions.
6B. Compression-only CPR
- If you are not trained to or are unwilling to give rescue breaths, give chest compressions only.
- If chest compressions only are given, these should be continuous at a rate of 100 - 120 min-1.
- Stop to recheck the victim only if he starts to show signs of life e.g. breathes normally, regaining consciousness, coughing, opening his eyes, speaking, or moving purposefully; otherwise do not interrupt resuscitation. 7. Continue resuscitation until:
- Qualified help arrives and takes over,
- The victim starts to show signs of life e.g. breathes normally, regaining consciousness, signs of life such as coughing, opening his eyes, speaking, or moving purposefully, OR
- You become exhausted.
SECONDARY SURVEY
The secondary survey, sometimes known as head-to-toe survey is undertaken after the primary survey, when immediately life-threatening conditions have been either ruled out or identified and treated. The purpose of the secondary survey is to establish what other injuries or presenting medical problems the casualty may have.
Action
- In a conscious casualty, ask them what has happened, or what the problem is. This will help focus your examination.
- Ask the casualty if they have any pain, noting location, description (stabbing, crushing, etc) duration and any relieving or exacerbating factors, for example, “it hurts when I breathe in”.
- Starting at the head working down the shoulders, over the collar bones, down both arms, chest, abdomen and both legs, look and feel for signs of injury such as bleeding, bruising, swelling, deformity, reduced movement and pain.
- Ask the casualty about any current medical problems, note any medications they are on and note any allergies.
- If trained to do so, treat injuries that you find with the aim of reducing pain and slowing or stopping the deterioration of the casualty’s condition.
Precautions
Treat any neck or back pain following trauma, such as a fall from height or road traffic collision with caution. You should suspect serious injury if the fall is greater than 10 feet.
Do not attempt to further assess a potential spinal injury and do not move the casualty unless needed for a life-saving intervention, such as opening their airway. Treat any pelvic pain following trauma with caution. Never push, rock or compress a suspected pelvic injury, do not move the casualty unless needed for a life-saving intervention.
Be aware of hidden injuries. Small but devastating penetrating injuries are not uncommon in areas such as the groin, armpits, and back which can be easily missed.
In a conscious casualty, always gain their permission to examine them and communicate what you are doing.
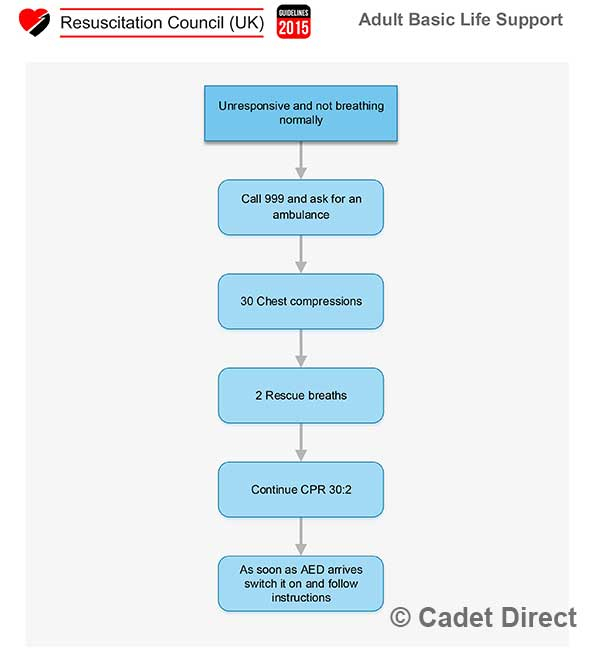
Adult Basic Life Support
TRAUMA
The term trauma often refers to a serious injury commonly caused in incidents involving a high mechanism, such as a road traffic collision or explosion. This section will concentrate on three types of traumatic injuries.
BLAST INJURY
A blast injury is a complex type of traumatic injury. Injuries can vary greatly depending on a large number of factors, such as the cause of the blast, the proximity of the casualty to the blast and the environment in which it occurs i.e. open or confined space. Injuries may be mostly internal and may affect predominantly hollow organs such as lungs, bowels etc. The casualty may present initially quite well NEVER underestimate the rapid nature at which this casualty could deteriorate.
Causes
- Explosion INJURY CLASSIFICATION Primary
- Injuries are caused by the blast overpressure or shock wave
- Most commonly affect the ears and hollow organs such as lungs and stomach
- Most likely to affect a casualty that is close to the explosion
- The casualty may lack external injuries
Secondary
- Injuries are caused by shrapnel and other objects propelled by the explosion
- Can cause penetrating trauma which is externally visible
- Small external wounds may conceal large internal damage and bleeding from high-velocity fragments
- Secondary injuries account for a high number of blast casualties
- Improvised explosive devices may be designed to increase the number of secondary casualties by the use of nails, ball bearings or other objects surrounding the device.
Tertiary
- Injuries are caused by casualties being thrown against solid objects such as walls or vehicles by the displacement of air from the explosion.
- Can create a wide range of injuries from bone fractures to penetrating injuries and occasionally impalements depending on where the casualty is thrown
- Smaller, lighter adults and children are at higher risk of tertiary injury.
QUATERNARY OR MISCELLANEOUS
- Any injury not included in the first three classifications
- Burns and crush injuries are examples of quaternary injuries.
Action
- Hemorrhage control and airway management (Primary Survey) Rapid transfer\evacuation to specialist care.
Precautions
- Always consider your own safety first. Could there be a secondary explosion?
- Do not underestimate a casualty’s injuries, they may be internal.
BLUNT TRAUMA
Blunt trauma is a general term used when an injury is caused by an impact that does not penetrate the body. It is sometimes referred to as nonpenetrating trauma.
Causes
- Physical assault e.g. punched, kicked or hit with a blunt weapon such as a bat
- Behind armor blunt trauma ( injury caused by the energy transfer associated with body armor stopping a high-velocity round)
- Sports injuries
- Road Traffic collision.
Recognition
- Suspect blunt trauma in any high mechanism injury i.e. where there has been high energy transfer
- Bruising, swelling and tenderness can all be signs of blunt trauma
Action
- If a spinal or pelvic injury is suspected keep patient still until specialist help arrives
- Internal injuries caused by blunt trauma require immediate specialist care
- Suspected chest, abdomen, and pelvic injuries are time-critical injuries. Do not delay getting specialist help.
PENETRATING TRAUMA
Penetrating trauma is caused by objects that enter or pass through the body (also known as perforating trauma). For a soldier, this injury type is usually associated with gunshot wounds or fragmentation injuries from improvised explosive devices. Other examples may include stab wounds and impalements.
Recognition
Penetrating trauma will usually, but not always be accompanied by pain and external blood loss Injuries may be identified on either the primary or secondary survey All penetrating injuries will have an entry wound
Action
- Control external hemorrhage and manage the airway as in the primary survey
- Closely monitor the casualty for signs of deterioration such as decreasing level of consciousness or increased difficulty in breathing
- In penetrating chest injury, position the casualty so the unaffected side is uppermost (injury down)
- Call for specialist help or arrange transport/evacuation without delay
Precautions
- Never remove an embedded object, it may cause further bleeding
- A small entry wound does not necessarily mean a small injury
- Look for an exit wound but there may not be one
- Remember to look in hidden areas such as armpits
SHOCK
Shock is a term commonly used by laypeople to describe a state of emotional distress following an accident or injury. In medical terms, it refers to a state when blood pressure falls to a dangerously low level leading to organ dysfunction and reduced levels of consciousness. Shock is hypo-perfusion of tissues, hypo-perfusion means reduced blood flow and therefore reduced oxygen. This is due to some sort of disruption in circulation, such as bleeding.
Causes
There are several causes of clinical shock. The most likely cause to be seen by a soldier is hypothalamic shock. This is simply a low volume of blood likely to be caused by a traumatic injury. Hypothalamic shock is the only type included in this guide however the treatment for all shock is generally the same.
Recognition
Pale, grey and clammy appearance
Increased rate of breathing
Weak, rapid pulse
Reduced level of consciousness
Actions
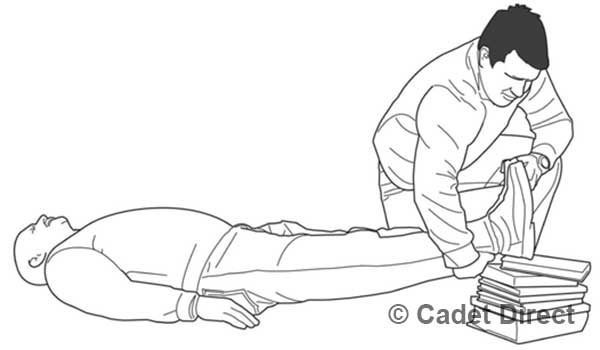
- Lay the patient down ensuring their airway is maintained
- Raise the patient's legs
- Continually monitor the patient for signs of deterioration, be prepared to start CPR if the patient becomes unresponsive and stops breathing normally.
Precautions
- Bleeding may be internal and not immediately obvious
BURNS
Burns can vary greatly in severity from small, superficial burns to full-thickness burns covering large areas of the body. The first aid treatment follows the same principle for any type of burn.
Causes
- Direct heat, e.g. flame
- Electrical
- Chemical
- Steam/hot gases
- Scald
Recognition
- Pain
- Redness (superficial)
- Red and white with blisters (Partial thickness)
- Charred or white and leathery (Full-thickness)
Actions
- Stop the burning process
- Cool the burn with cool or lukewarm water (not ice cold) for 10-30 minutes
- Wash off chemicals with copious amounts of water
- Once cooled, cover the burn with a nonadherent dressing. Strips of cling film are ideal
Precautions
- Monitor the casualty for signs of shock and hypothermia
- Do not attempt to remove clothing stuck or embedded in the wound
- Keep the wound as clean as possible to reduce the chance of infection
- Do not remove any loose clothing and other items, that may be on or attached to the injury.
HYPOTHERMIA
Hypothermia occurs when core body temperature drops below 35°C. This is the temperature required for the normal function of the body’s metabolism and organs.
Causes
- Exposure to a cold environment
- Immersion in water
- Wet Clothing
- Major Trauma
Recognition
- Shivering (Mild)
- Pale appearance, shaking, reduced coordination, stumbling, and confusion (Moderate)
- Difficulty speaking, unusual behavior such as removing clothing, stumbling or falling and cessation of shivering (Severe)
Actions
- Remove the casualty from the cold environment if possible
- Remove wet clothes and replace with warm, dry clothes or blankets
- In moderate to severe hypothermia, more aggressive active re-warming may be required. This can be achieved by placing warm items such as warm water bottles in the armpits and groin areas of the casualty
Precautions
- A casualty suffering from moderate to severe hypothermia may become aggressive when confused
- Alcohol consumption increases the likelihood of hypothermia
- Complex problems can arise during re-warming of a severely hypothermic casualty, they require specialist medical treatment without delay.
HYPERTHERMIA
Hyperthermia describes a condition where the body’s core temperature rises above a normal level due to an inability to dissipate heat quicker than it is absorbed. Between 37°C and 40°C can be classified as heat exhaustion. When core temperature rises above 40°C this is called heat stroke.
Untreated, heat exhaustion can rapidly progress to heatstroke. When temperatures inside the body reach these levels it can cause break down of cells and organ failure. Heatstroke can be life-threatening.
Causes
- Prolonged exposure to a hot or humid environment
- Extreme physical exertion
- More likely if dehydrated or alcohol is consumed
- Some medication (rarely) Recognition Heat Exhaustion
- Feeling sick
- Feeling Faint
- Sweating heavily Heat Stroke
- Confusion and disorientation
- Rapid breathing
- Reduced level of consciousness
Actions
- Stop any physical activity
- If possible remove casualty to cooler area or shade
- Remove excess clothing
- Cool by fanning the casualty
- If they are conscious give them cool, not cold water to drink
- Submersing both arms up to the elbows in cool water for 5-10 minutes can quickly reduce body temperature.
Precautions
- If the actions above are followed quickly, heat exhaustion often resolves with no lasting effects after 30-60 minutes. Heatstroke, however, is a medical emergency and specialist help should be obtained whilst attempting to cool the casualty.
FRACTURES
Fractures or broken bones occur as a result of a direct impact or stress on the bone. In first aid, they can be classified into two distinct types, closed (simple) and open (compound)
A closed or simple fracture is when the skin is left intact. An open or compound fracture is when the skin is broken exposing underlying tissues surrounding the fracture. This is often caused by sharp ends or fragments of bone breaking through the skin at the point of injury. Open Fractures are much more prone to complications such as infection. A third category is a complicated fracture when the sharp bone ends interfere and damage surrounding blood vessels and nerves.
Causes
- Direct force or impact
- High stress applied to the bone
A. Closed Fracture. Skin not broken.
B. Open Fracture. Bone has a broken surface of the skin. Dangerous; external loss of blood and serious risk of infection.
C. Complicated Fracture. When an internal nerve or organ is also injured and when the fracture is connected with a dislocated joint.
D. Symptoms and Signs. Casualty heard it break. Pain at site of injury. Swelling, bruising later. Deformity, bone grating and shock.
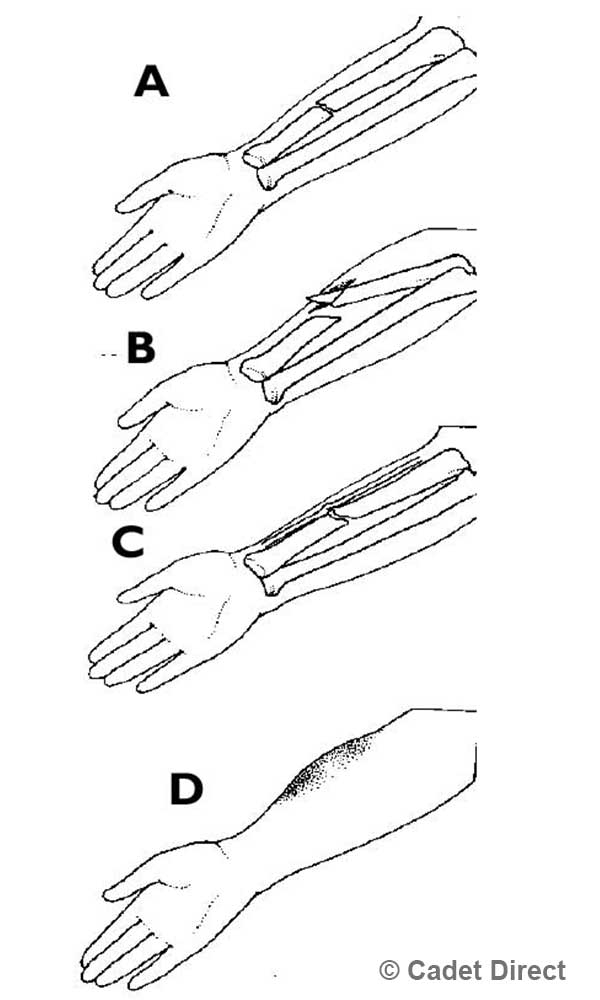
Fractured Arm
Recognition
- Pain
- Swelling
- Deformity
- Reduced range of movement
- Visible bone (open fractures)
Actions
- Manage and control external bleeding
- Immobilize the affected limb in a position that is comfortable, this may be as simple as providing support or padding
- Cover open wounds with a clean, preferably non-adherent dressing. If there is bone protruding from the skin, bandages can be used either side of the bone to provide padding and protection.
Precautions
- Fractures are usually very painful. Do not let them distract you from higher priority injuries. Always complete your primary survey.
- Large bones such as the femur (thigh bone) and the pelvis require very high forces to cause a fracture and can cause significant, even life-threatening internal blood loss. Monitor for signs of shock and do not delay getting specialist help.
- Be aware of other complications e.g. interruption of blood supply to are below breaks.
SEIZURES
Seizures vary greatly in their appearance and are caused by a number of physiological and sometimes psychological conditions. The type of seizure most people will be familiar with or recognize is most commonly seen in epilepsy.
Sudden, chaotic electrical activity in the brain causes the casualty to become rigid followed by an episode of uncontrollable convulsing or shaking.
This is known as a tonic-clonic seizure. Undiagnosed epilepsy is possible in a soldier, however other causes of seizures should also be considered. All seizures need to be investigated at a hospital.
Causes
- Epilepsy
- Head injury
- Low blood pressure
- Low oxygen levels, for example, following a period of airway obstruction or breathing difficulties
- Hypoglycemia (low blood sugar) Recreational drugs
- Conditions affecting the brain, such as tumors
Actions
- Maintain an open airway
- Lay the casualty down if possible preferably on their side
- Move objects away from the casualty that may cause them injury whilst they are convulsing/fitting
- Loosen tight or restrictive clothing.
Precautions
- Never try and restrain someone that is having a seizure
- Seizures burn a huge amount of energy, once the casualty has stopped convulsing they may remain very drowsy or sleepy for hours - called Post Ictal Period.
- Casualty may bite their tongue during a seizure causing a potential airway obstruction from bleeding
- Most seizures last only seconds and are self-limiting, however, be prepared for repeated seizures
- Do not delay in getting specialist help. A seizure may be the sign of a serious underlying condition or injury. A continual seizure is a life-threatening condition. A Continual seizure is a fit where the patient does not regain consciousness once the fit has ended and another fit happens. Longer than 40 mins may cause significant brain injury.
CASUALTY POSITIONS
When you have identified what is wrong with the casualty, take the time to make them more comfortable, and assist recovery, here are a few suggestions.
IF ITS IN THE HEAD RAISE THE HEAD, laid down with head raised, used for head injuries, unless spinal is suspected, or eye injuries.
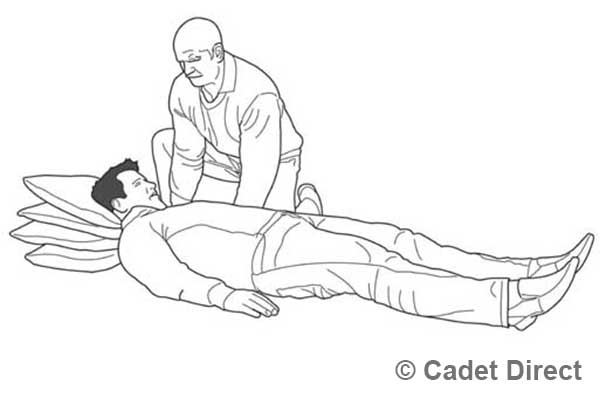
Rasing the head
IF THE FACE IS PALE, RAISE THE TAIL, raising the legs should calm the casualty down and slow bleeding

Raising the legs
IF ITS IN THE CHEST SITTING IS BEST, the half-sitting position, sat up, supported knees raised, useful for chest injuries, conscious heart attack casualties, breathing problems, massive allergic reactions.
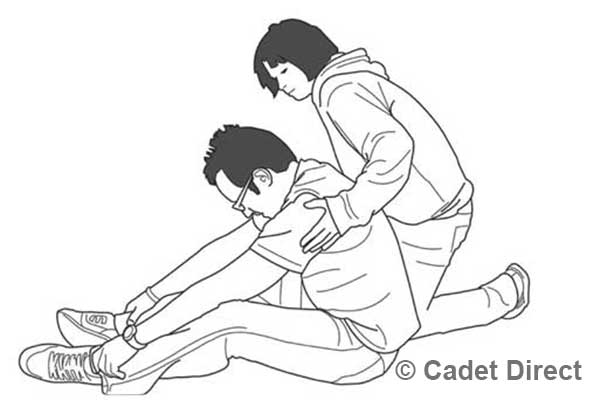
Sitting Position
IF ITS THE ABS PROP KNEES WITH A BAG, this position with the casualty laid down and the knees slightly raised is the suggested position for a fractured pelvis and abdominal wounds.
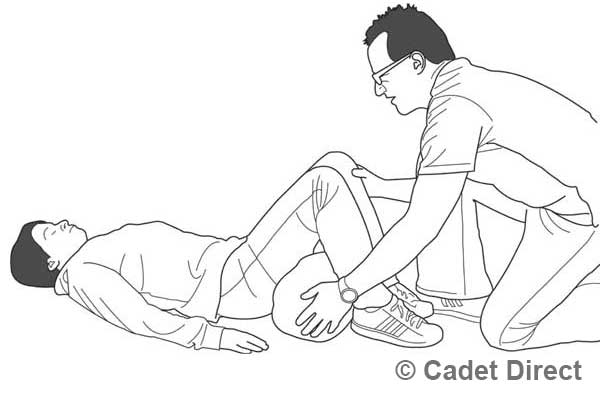
Raising the Knees


