Visa & Mastercard
Debit/Credit Payments Accepted

The article below is an extract from the Leading Cadet Resource Book. Please note this information is subject to Copyright 2018 Thomas Grocott. Not for reproduction. Thomas Grocott has asserted his right to be identified as author of this work in accordance with the Copyright, Designs and Patents Act 1988. All rights reserved.Some images in this publication are Crown Copyright and contain public sector information licensed under the Open Government Licence v3.0.

Land Navigation Using Map & Compass
LO1: Be able to show the different types of north.
• Identify the different types of north.
• Explain how to find true north using a map without a compass
LO2: Be able to use a map and lightweight walking compass for practical navigation.
• Identify the features of a lightweight walking compass.
• Carry out basic calculations using map and compass to calculate direction of travel and position.
LO3: Know land navigation methods.
• Calculate timings of walks using Naismith’s Rule.
• Identify what is meant by handrailing, aiming off, contouring and attack points.
LO4: Know weather conditions that affect land navigation.
• Identify how high and low atmospheric pressure affects land navigation.
• Describe cloud formations that affect land navigation.

Grid North
• The world has been divided into horizontal and vertical lines to make it easier to navigate.
• The east-west lines are lines of latitude and the north-south lines are lines of longitude.
• These lines are curved, getting closer together nearer the top and bottom of the Earth to take account for the curve in the earths surface. They meet at the northern and southern tips of the globe.
• The imaginary point where the lines of longitude meet at the top of the globe is known as grid north.
True North
• True north is at the geographic north pole. There is no physical ‘north pole’ because it is located in the middle of the artic ocean and is always covered in moving sea ice. However, its exact location is known and stays the same.
• True north is not the same as grid north. The difference between true north and grid north can be as much as 2°.
Magnetic North
• The Earth has its own magnetic field. When a compass points to north it points towards magnetic north.
• Magnetic north is not the same as true north or grid north. In fact, magnetic north is located in Northern Canada. It changes slowly over time.
• In the UK in 2018 magnetic north is between 0° and 2° west of grid north.
• The difference between grid north and magnetic north is known as the Grid Magnetic Angle (GMA).
The Grid Magnetic Angle
• The grid magnetic angle becomes important when you start navigating using a map. A compass uses magnetic north, but a map uses grid north.
• All Ordnance Survey (OS) maps will tell you what the grid magnetic angle is for that particular map.
• The difference between magnetic north and true north is called magnetic variation, but we don’t normally use this when navigating.
• The difference between the types of north are illustrated below:


Setting a map means turning it around so that identifiable features on the ground line up with the correct place on the map.
• A correctly set map will be lined up with landmarks in the terrain like lakes, rivers, roads or mountains.
• Setting a map can be done anywhere, however it is often easier from a high vantage point, as you can see more features around you.

• Using both natural and manmade features will help you to pinpoint a more accurate position.
• Setting the map and then walking with it will help you to pinpoint your position and help you to find north.
• If there are no identifiable features, you can also set your map with a compass. This will be described later.
Summary
• Look for identifiable features both on the map and on the ground.
• Rotate the map until the features are in line.

Setting your map will help you to find grid north. But there are other ways to find north, even without a map.
Look for the North Star
• The North star (otherwise known as the Pole Star, or Polaris) is a reliable way of finding true north at night when it may be difficult to see.
• To find the North star, look for the plough constellation. The two ’pointer’ stars at the end of the plough point towards the North star.
• This method can be more accurate than using a compass, as magnetic north can change. The North star stays in the same place.

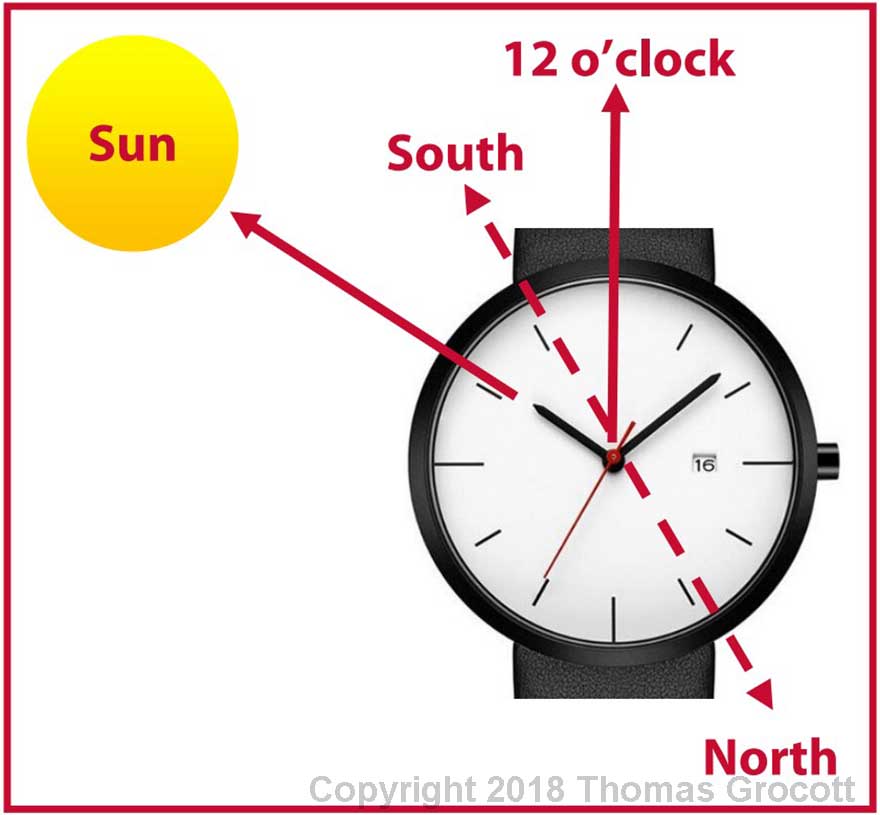
Use a Watch
• You can use also use your watch to help you find north.
• Hold your watch horizontally with the hour hand pointing towards the sun.
• Between November and March, halve the angle between the hour hand and the 12 o’clock position. This points south.
• Between April and October (during British Summer Time), halve the angle between the hour hand and the 1 o’clock position. This points south.
• When you have done this, turn around 180 ° to face north.
• If you only have a digital watch, draw a diagram of an analogue watch with the correct time on it and use that instead.
Using Shadows
• The sun must be bright for this technique to work.
• Place a stick in level ground and place it upright so you can see its shadow.
• Mark the ground at the end of the shadow.
• Wait 15 minutes and then mark the end of the shadow again, marking a straight line between the two points.
• The first mark is west, the second is east.
• The straight line between the two points is roughly north.

Summary
• If you cannot find north at night, use the north star to point your way north. Use the pointer stars on the plough constellation to help.
• You can use your watch to find north. Point the hour hand at the sun and halve the distance between the hour hand and 12 o’clock (or 1 o’clock in summer). This imaginary line will guide you south. Turn around 180° to go north!
• Use shadows to find north. Put a stick in the ground and mark the shadow. Wait 15 minutes and mark the new position of the shadow. The imaginary line in-between points north.

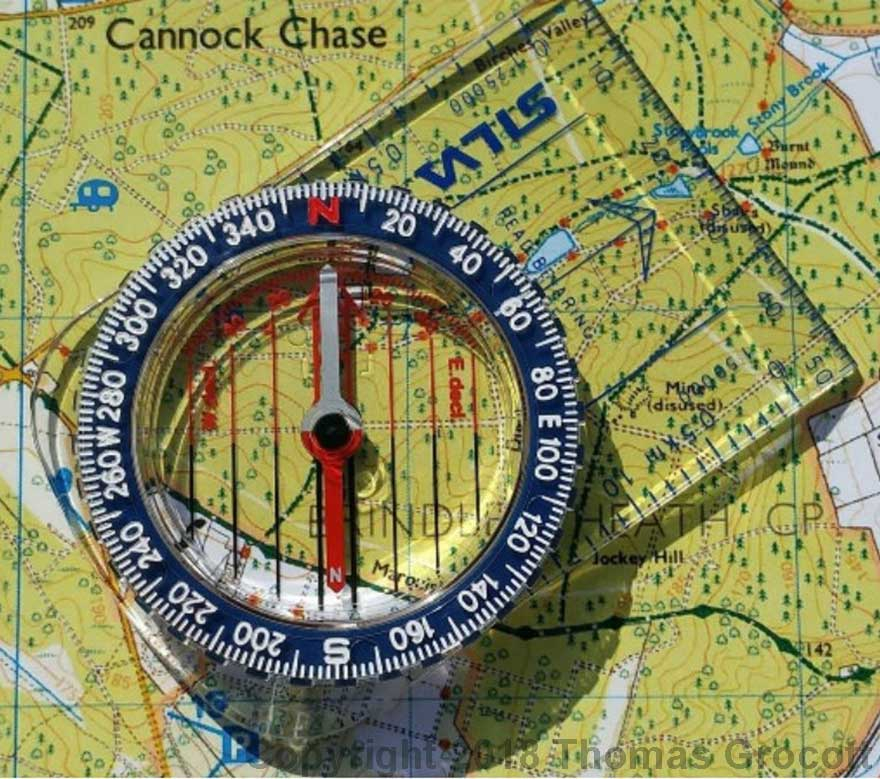
A compass uses the Earth’s magnetic field to point towards magnetic north. It is a powerful navigation tool which, when used correctly, can prevent you from getting lost.
Compass Features

Compass Points
• There are eight main points on a compass. North, south, east and west are known as the cardinal points. The other main points are found between these and are shown below.
• On a compass the direction we want to travel can be measured using degrees. This is an accurate way of determining direction and is called finding a bearing.

Compass Care & Usage Tips
• Stand away from metal objects when using a compass. Watches, fences and mobile phones can all change the position of the needle in the compass and cause inaccurate readings.
• Hold the compass flat to allow the needle to move freely.
• Don’t drop or knock your compass.
• Store the compass away from electrical equipment and other compasses.
• Sometimes air bubbles can be found in the compass housing. A small air bubble is fine if the needle still moves freely. A larger air bubble usually means the compass needs to be repaired or replaced.

Learning how to use a compass properly is an important outdoor skill. It helps you find where you are and find your way, especially if you get lost and visibility is poor.
Setting the Map With a Compass
• If visibility is poor or there are few discernible features in the landscape, you can set your map using a compass:

1. Subtract the grid magnetic angle
Turn the compass bezel until the index line lines up with 0° (north). Then subtract the grid magnetic angle (GMA) by turning the compass bezel clockwise. In this instance the GMA is 2°.

2. Place your compass on the map
Put your compass on the map by lining up the edge of the base plate so it is parallel to the eastings (the lines that run from north to south) on the map. As you have subtracted the GMA, lines on the compass housing will not quite line up with the edge of the baseplate.

3. Turn the map and compass to north
Turn the compass and map together until the red north needle falls within the middle of the red orienting arrow on the compass housing. Make sure it is the red part of the needle that is inside the arrow (not the white half).
Your map will now be set correctly.
Setting a Compass Heading
• If you know where you are on a map and want to find out which way to travel you can set a compass heading, pointing you in the right direction:

1. Place your compass on the map
Place the compass on the map with its edge close to your current location. The direction of travel arrow should be pointing to your destination. In the image we are travelling north-east.

2. Turn the compass housing
Keeping the compass firmly in place, turn the orienting lines on the bezel until they are parallel to the eastings (the lines that run from north to south) on the map. The arrow inside the compass housing should be pointing to the top of the map.

3. Add the grid magnetic angle
Because we are going from grid north to magnetic north, we need to add the grid magnetic angle to get a compass bearing. Find the index line and add the GMA. In this case it is 2°. This rhyme will help you remember to add the GMA: GRID TO MAG - ADD

4. Turn to line up the compass
Lift the compass off the map. Keep it horizontal and turn your body until the red north needle falls in line with the red arrow in the compass housing.This is your heading (direction of travel).
Walking on a Bearing
• Once you have your bearing to walk on don’t walk with your head down, staring at the compass needle.
• Look where the direction of travel arrow is pointing, and pick out a feature in the distance which you can walk towards instead.
• If visibility is poor look for smaller features, like gates or rocks, and walk towards them. As you get closer to your chosen object, other features may appear in your direction of travel.
Getting a Map Bearing
• If you want to confirm your direction of travel (for example, at the junction of two paths) then you can take a magnetic bearing on a compass and convert it to a map bearing:

1. Select a feature on the ground
Choose a feature on the ground that you can also see close to the route you should be taking on your map. Hold the compass horizontally, with the direction of travel arrow pointing towards the feature. Rotate the compass bezel until the red north needle falls in line with the red arrow on the compass housing. This gives you the magnetic bearing, which you can walk along if you wish.

2. Subtract the grid magnetic angle
Because we are working from a magnetic bearing to grid bearing, we need to subtract the grid magnetic angle (GMA) from the compass bearing. Find the index line and subtract the GMA. In this case it is 2°. This rhyme will help you remember to subtract the GMA: MAG TO GRID - GET RID
3. Place the compass on the map
Put the compass on the map with the edge of the base plate through your existing position. Then rotate the whole compass (not the bezel) until the orienting lines are parallel to the eastings (the lines that run from north to south) on the map. The edge of the base plate should now be pointing towards the feature you want to travel towards.

4. Turn to orient yourself and the map
Turn around until the red north needle falls in line with the red orienting arrow on the compass housing. You have now confirmed your direction of travel and set your map.
Resection
• If you are not sure of your exact position on a map, identify three features on the ground around you and get a compass bearing for each one. Then, convert each one to a grid bearing (see Getting a Map Bearing).
• Mark each of the bearings on your map using a line. Use the long edge of the base plate of the compass to make sure the line is straight.
• The three lines should come together to form a small triangle. Your position will be in the middle of the triangle.

Compass Base Plate & Measuring Distance
• Most compasses have a variety of rulers and markings printed on the base plate.
• These markings will have scale numbers (like 1:25000 or 1:50000) which correspond to the scale on your map.
• These can be used to measure distance accurately. Make sure you choose the correct scale ruler for your map.
• If you don’t have a compass with the correct scale markings you can use a strip of paper to help you calculate your distance.
• Place the paper on the map and place a dot at your start position. Mark and rotate the paper every time you make a turn so you are following the path you want to measure. Put a final mark at the end of your route.
• Place the piece of paper on the scale line, which is on the edge of your map. Measure the gap between the first and last dot to find your distance.

The base plate of most compasses have different scale rulers printed on them.
Summary
• You can set your map with a compass if visibility is poor or there are no discernible features on the ground.
• Setting a compass heading will help you to find the correct direction of travel on the ground from a map.
• When finding a compass heading use the rhyme: GRID TO MAG - ADD
• Convert a compass bearing to a grid bearing to confirm your direction of travel.
• When converting a compass bearing to a map bearing use the rhyme: MAG TO GRID - GET RID
• If you are unsure of your exact location, you can get three compass bearings of three nearby features and convert them to map bearings. Your location will be in the centre of where the bearings meet.
• You can use the base plate of a compass, string, or a piece of paper to measure distance on a map.

Experienced walkers will know that it takes longer to travel up or down a hill than walking the equivalent distance on level ground. They take this extra time into account when planning a walk and use Naismith's Rule to help them do this accurately.
• Naismith’s rule was devised in 1892 by William Naismith, who was a Scottish mountaineer. It helps walkers to calculate the extra time needed when travelling up or down a hill.
• The rule helps when planning a route and is routinely used when filling in route cards to get an accurate estimated time of arrival (ETA).

• For example, for a walk that is 8km long with 200m of height climbed you would perform the following calculations:

• Naismith’s rule works for walkers of reasonable fitness, on typical terrain, and under normal conditions. It does not account for delays, such as extended breaks for rest or sightseeing, or for navigational obstacles like fallen tree branches, impassable paths or forestry work which may close off certain areas temporarily.
• You normally don’t need to add any time for travelling down slopes on longer journeys. But for short journeys travelling down steep terrain you should add ten minutes for every 200m of descent.

Don’t just rely on your compass for accurate navigation. These pages describe a range of methods you can use to improve your navigation.
Errors in Navigation
• It’s important that you don’t just rely on your compass for navigation. Slight errors in taking a compass bearing can become big ones quickly. An error could be as simple as forgetting to add or subtract the grid magnetic angle, so do take care.

This diagram demonstrates how an error of only 4° make an area of uncertainty (error) very large after only a short distance.
Handrailing
• You can use linear features on your map to help you navigate. Following them is called handrailing.
• Features that can be used for handrailing include edges of forests, paths, streams and rivers, edges of lakes, powerlines, and fence lines or walls. But be careful - some features may have been repositioned so make sure you are using the latest version of the map.
• When handrailing along a river or stream do not accidently follow tributaries. Take a compass bearing and convert it into a map bearing if you are not sure which branch of a stream to take.

Streams and tree lines are good features to handrail.
Aiming Off
• Aiming off is a technique used to get to a destination (like a bridge, shelter or campsite) next to a linear feature.
• Instead of heading directly to your destination, you deliberately ‘aim off’ your bearing to a linear feature (like a path) to the left or right of it.
• In doing so, you will know whether to turn left or right. If you head directly to the linear feature and end up in the wrong position due to a navigational error you would not know which way to turn.
• This is useful when you cannot see your destination because of poor weather, hills blocking the view or when there’s tree cover.

Instead of heading straight to your destination, aim off to the left or right.
Contouring
• Sometimes it is easier (and less effort) to walk around a hill following a contour line rather than going over it, especially if the hill is steep. This is known as contouring.
• Take care not to lose height when using this method. Try to find a feature like a knoll, rock or stream which you should not travel past. These are called collecting features and will prevent you from going too far off-track.

It is easier to contour around this hill instead of going over the top.
Attack Points
• An attack point is a feature that is relatively close to your destination but is easier to find then the destination itself, like a small hill or lake.
• Aim for the attack point first rather than aiming for your destination.
• Using an attack point will help you to find your destination more easily, even if it means going slightly out of your way.
Summary
• Use Naismith’s rule to help plan how long it will take to complete your route.
• Remember that small errors in navigation can become big ones quickly if they are not corrected.
• Find linear features on your map to handrail (walk along).
• If you cannot see your destination aim off against a linear feature. That way you will be sure which direction to turn to get to your destination.
• If a hill is steep it may be easier to walk around it following a contour line. This is known as contouring.
• If your feature is hard to find then travel towards a larger or easier to see feature nearby. This is known as using an attack point.

The weather in the UK can be very unpredictable. This could cause problems on expeditions. However, the weather can be predicted and action can be taken accordingly to reduce any risks associated with poor weather.
Hot and Cold Air Masses
• When air moves a long distance it becomes the temperature of the area around it. It can also pick up moisture, especially if it moves over the sea.
• The UK is generally affected by six main air masses which influence the types of weather we have.
• Four of these air masses come from the north and are seen as cold air masses. Two come from the south and are known as warm air masses.

The UK’s is affected by six main air masses.
Polar Maritime - From Greenland and the Artic Sea.

This is the most common air mass to affect the UK. Wet, cold air brings heavy showers and storms, particularly in the north and west in winter. In summer it brings cool winds and heavy showers.
Artic Maritime - From cold Artic seas.

Similar to polar maritime, but less moist. Uncommon in summer, but brings very low temperatures and showers when it occurs. In winter it brings very strong northerly winds and snow, particularly in the north. Sometimes leads to widespread, heavy snow.
Polar Continental - From Siberia and Eastern Europe.

Predominantly occurs from November to April, but in summer can bring warm and dry weather. In winter it is always very cold (below 0°C), with clear skies and hard frosts. Snow is possible if the air mass picks up enough moisture over the sea.
Tropical Continental - From North Africa and the Sahara.

Most common between June and August. High temperatures (around 30°C) and very dry, as the mass doesn’t pick up much water vapour from the sea. Occasional thunder storms. Often hazy because of sand from the Sahara.
Tropical Maritime - From the Atlantic Ocean near the equator.

Brings warm, wet air and low cloud and drizzle during the summer. In winter it brings warm air, hill fog and drizzle. Can bring prolonged rainfall in westerly mountains.
Returning Polar Maritime - From Canada before moving south.

Picks up warm air and water vapour before reaching the UK. Warm in summer with storms and showers inland. Low cloud, but usually dry in winter.
High and Low Air Pressure
• High and low pressure differences cause changes in our weather. Pressure changes occur when air moves.
• Areas of equal air pressure are marked on a weather map in lines called isobars.
• The distance between isobars shows us how quickly the pressure will change (pressure gradient). The closer isobars the are together, the windier it will be.
• The smallest number in a circle is low pressure and is called a low, or depression. This often brings wet and windy weather.
• The largest number in a circle is high pressure and is called a high, or anticyclone. This often brings dry, sunny weather.

Areas of equal air pressure marked on a map are called isobars. The pressure is measured in millibars.
Fronts
• We have looked at different air masses that affect the UK. Fronts occur when two air masses meet. They are associated with lows (depressions).
• In the northern hemisphere winds travel anti-clockwise around low pressure, so if you have your back to the wind, the worst of the weather is on the left.
• There are three types of fronts: warm fronts, cold fronts, and occluded fronts. Combinations of these fronts are called frontal systems.
Warm Fronts
Warm fronts are represented by this symbol on a weather map:

The semicircles point towards colder air and the direction of movement. Warm fronts are formed when the warm air from one air mass rises over the cold air from another. As the air lifts into regions of lower pressure it expands, cools and forms wide flat sheets of cloud.
Cold Fronts
Cold fronts are represented by this symbol on a weather map:

Cold fronts are usually linked to areas of low pressure (depressions). This is the transition zone where the cold air replaces the warmer air mass. The cold air follows the warmer air and gradually moves under it. When the warm air is pushed up it will rain heavily. It will often rain the most when a cold front passes. The temperature will be cooler than before and you will see clouds move in the sky.
Occluded Fronts
An occluded front is represented by this symbol on a weather map:

In a frontal system (see the diagram below) cold fronts move slightly faster than warm fronts. Eventually the cold air will slide under the warm air to form a continuous layer of cold air at ground level with the warm air above it. Occluded fronts bring changeable weather conditions.
Frontal Systems and Depressions
• Depressions are areas of low pressure that create poor weather.
• Frontal systems often originate in the Atlantic and travel east towards the UK. The diagram and table below illustrate typical weather patterns and cloud types that can occur as a frontal system moves.
• More information about the cloud types in each stage can be found in the next section of this chapter.

Stage 1 - Sky clearing of cloud.
Stage 2 - Showers from cumulus clouds.
Stage 3 - Heavy rain/ thunderstorms from large cumulonimbus clouds.
Stage 4 - Clear. Light cirrus clouds.
Stage 5 - Steady, sometimes heavy rain from altostratus/ nimbostratus clouds.
Stage 6 - Drizzle from cumulus. May see cirrostratus clouds.
Stage 7 - Sky clearing. Cirrus high level clouds.
Anticyclones
• Anticyclones are areas of high pressure with light winds moving in a clockwise direction.
• Warm air sinks in these systems, meaning no rain or clouds are formed because warm air can hold more water.
• In summer anticyclones bring dry, hot weather. In winter they may bring cold nights and frost. Anticyclones can also bring fog and mist when it is cold as the cold forces moisture in the air to condense.
Tips for Anticipating the Weather
• Always check the weather forecast before your expedition and ideally just before you are due to set out. The Met Office provide detailed, accurate weather forecasts for areas that are popular with walkers.
• Always be prepared for changing weather conditions as changes can occur rapidly, especially in exposed or isolated areas. Take plenty or warm and waterproof clothing with you on any expedition, even if you expect good weather.
• Look at the clouds. Large cumulonimbus clouds usually mean poor weather is on its way. Small cumulus clouds that group together are also usually a warning of bad weather, as are sudden changes in temperature or wind speed.
Summary
• There are six main air masses that affect the UK.
• When two air masses meet a drop in pressure occurs and the weather changes. This is called a depression.
• There are three types of weather fronts; cold fronts, warm fronts, and occluded fronts.
• Check the weather forecast before going on any expedition.

We have already learnt that different cloud types are generally found in different areas of a front. Here are some different cloud types and the heights they can be found in the sky.

Cumulonimbus Clouds - Very tall, rain-producing clouds that flatten out into an anvil type shape.
Cumulus Clouds - A low cloud that is puffy and white or light grey. They have sharp outlines and a flat base.
Altocumulus Clouds - Medium-height greyish-white clouds. One part is often darker than the other. Usually found in groups.
Nimbostratus Clouds - Dark grey continuous rain clouds with ragged bases sinking towards the ground.
Altostratus Clouds - Medium-height greyish clouds May be followed by a poor weather nimbostratus cloud if moving towards you.
Cirrostratus Clouds - High-level thin clouds covering the sky and containing ice crystals. Usually come 12-24 hours before a rain storm.
Cirrus Clouds - High-level wispy clouds made of ice crystals. Seen during fair weather, but a warm front bringing bad weather may be on its way if they are followed by cirrostratus clouds.
Summary
• Clouds are found at low, medium and high levels. All behave differently.
• Some clouds bring rain and poor weather and others bring warnings of poor weather to come if a front is moving through the area.
• Look out for different types of cloud whilst on expedition. They could give you clues as to what weather is coming next.