Airmanship for First Class Air Cadets
The article below is an extract from the First Class Cadet Resource Book. Please note this information is subject to Copyright 2018 Thomas Grocott. Not for reproduction. Thomas Grocott has asserted his right to be identified as author of this work in accordance with the Copyright, Designs and Patents Act 1988. All rights reserved.Some images in this publication are Crown Copyright and contain public sector information licensed under the Open Government Licence v3.0.
LO1: Know the features of an airfield.
• Describe types of runway layouts found on airfields.
• Describe the main features of airfields.
LO2: Know what is required for a passenger pre-flight briefing.
• Describe pre-flight briefings.
• Identify functions and operations of safety equipment as part of pre-flight briefings.
• Describe actions required in emergencies by pilots and passengers.
LO3: Know the features and types of aircraft used for air experience flights and gliding.
• Describe key features of Tutor and Viking aircraft.
• Identify important control surfaces used in flight.
LO4: Know processes used to launch gliders and maintain flight.
• Describe processes used to launch gliders.
Features of Airfields
There are many different types of runway in the UK. The RAF broadly fly from three different types; grass airfields, triangular pattern runways and main instrument runways. These runways all have their own advantages and disadvantages which we will explore below.
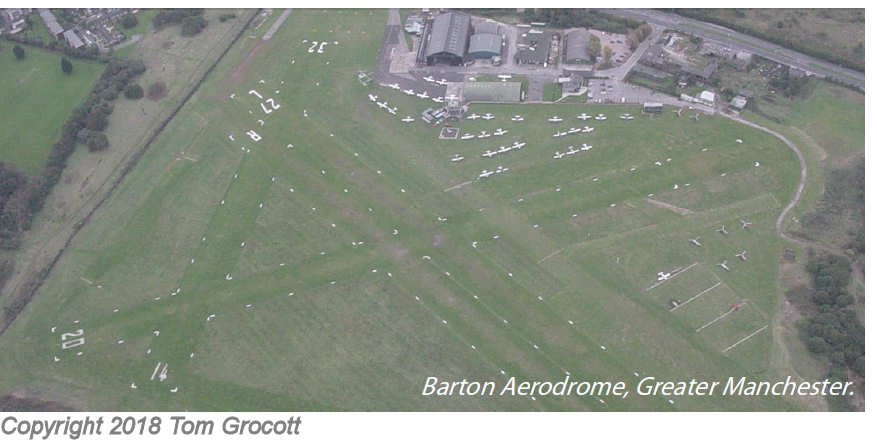
The Grass Airfield
• Normally used only for light aircraft and gliders.
• In the RAF these runways are normally only used for Volunteer Gliding
• Squadrons or flying clubs using private aircraft.
Pros
• Cheap to build - no need to lay tarmac.
• Some have no designated runway. Others have multiple marked runways.
• Aircraft can take off in any direction.
Cons
• Susceptible to wet weather - aircraft can get bogged down in the mud.
• Rough terrain makes for bumpy landings and can cause maintenance issues for both the land and the aircraft using the airfield.
• Would not normally support large aircraft because of their weight.
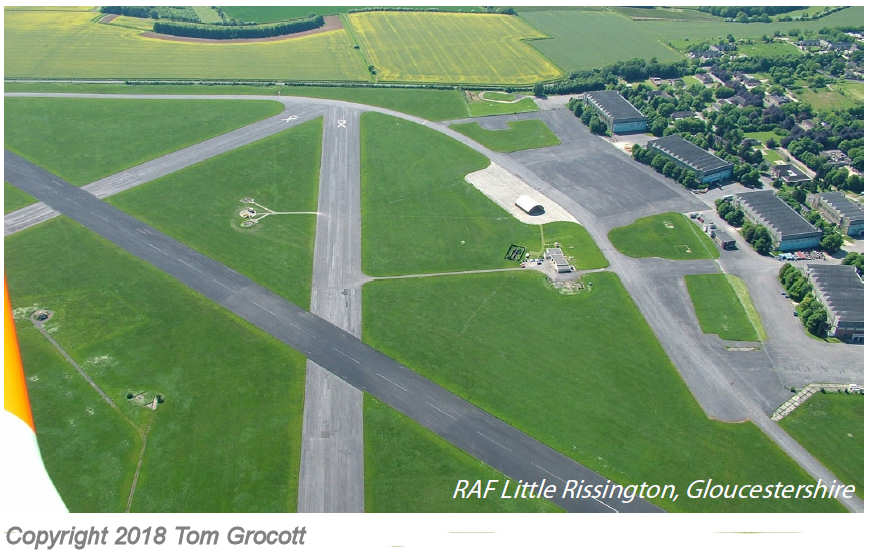
The Triangular Pattern Runway
• During the Second World War, 1940s aircraft became heavier and needed harder and smoother runways.
• The triangular pattern was developed to give length required as well as choice of take off/landing direction into wind and to avoid the cross wind
issues. The layout of the airfield makes it more difficult to attack and completely disrupt operations.
Pros
• Longer runway – for heavy or large aircraft.
• Three runway directions, to take off and land closer to the wind direction.
• Aircraft easier to control on the ground – designated taxiways are like roads meaning aircraft can only be in certain areas.
• More difficult to attack – if one runway is damaged the others are usually OK.
Cons
• More costly to build – lots of concrete or tarmac is needed for the lengths required.
• Harder to repair if attacked – tarmac needs to be replaced.
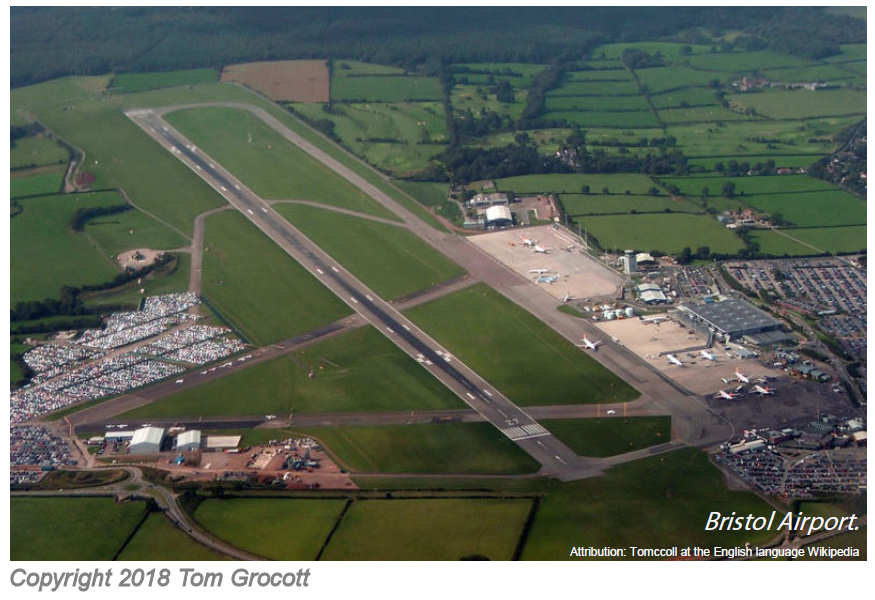
The Main Instrument Runway
• Over recent years aircraft have become heavier and have faster take off speeds, so one long runway has evolved.
• This is known as the main instrument runway as it has many landing aids.
• Additionally, faster approach speeds mean that cross wind has less effect.
• Major airports may have multiple runways; often airliners take off and landing simultaneously (on adjacent different runways).
Pros
• Length of runway suitable for modern high performance aircraft.
• Has many landing aids to aid a successful descent.
• Faster approach speeds mean that cross wind has less effect.
Cons
• Better suited to large or high performance aircraft and instrument landing.
• Smaller aircraft do not need the length of runway and most cannot land with instruments.
• Very expensive to build/ maintain.
Runway Layouts
The image below shows a diagram of a military airfield. A modern airfield has many different features that enable it to run effectively. The following pages will explain what each part is and what it is used for.
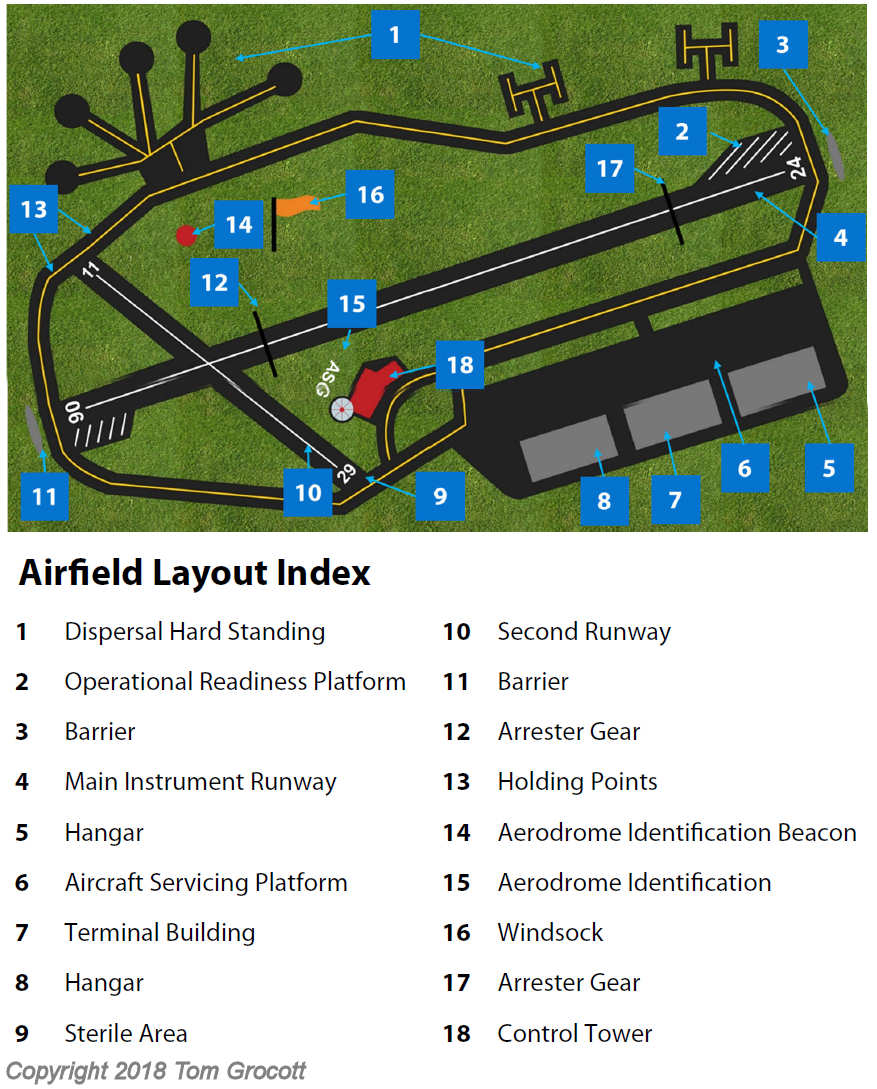
1 - Dispersal Hard Standing
Used for parking aircraft. The aim is to spread the aircraft around the airfield, to make it more difficult for enemy aircraft to damage or destroy all the aircraft in one go. Some airfields may have hardened aircraft shelters, which protect the aircrews and ground crews as well as aircraft.
2 - Operational Readiness Platform
Special Areas for fighter of strike aircraft on the end of the runway. Parking for aircraft to take off rapidly with little warning. Often has space for essential ground equipment.
3 - Barrier
A large net designed to slow down an aircraft in case of brake failure. They can be raised and lowered by the airfield controller by remote control.
4 - Main Instrument Runway
Normally 45m wide and 1,800m or more long. For transport aircraft, the main runway is normally 60m wide and 2,700m or more long.
5 - Hangar
Where aircraft and associated equipment is stored. Protect aircraft from the weather and direct sunlight. Used for maintenance and repair of
aircraft.
6 - Aircraft Servicing Platform
Large paved areas for the servicing and turn-round of aircraft. Help handle passengers and freight quickly
7 - Terminal Building
A building for passengers allowing them to board or leave an aircraft. Tickets, luggage and security are all dealt with in the terminal building.
8 - Hangar
See 5
9 - Sterile Area
An area on the runway that shouldn’t be used if there is an obstruction before the start of the runway, like a railway line with a train on it. This prevents accidents by moving the start of the runway further forward.
10 - Second Runway
Usually shorter than the primary runway. Used if the main runway is out of service or because of wind direction.
11 - Barrier
See 3
12 - Arrester Gear
Military airfields sometimes use this to stop aircraft quickly. Aircraft hook onto a cable suspended across the runway,
releasing a cable slowly to stop the aircraft.
13 - Holder Points
A line on the taxiway either side of the runway. Aircraft cannot pass without permission from Air Traffic Control.
14 - Aerodrome Identification Beacon
Not now normally used, due to improvements in aircraft navigation. Were used at night. Flashed the airfield identification letters in Morse code using a high-intensity red light.
14 - Aerodrome Identification
This is a 2 or 3 letter identifier for the airfield which is marked on the ground in large letters. Each airfield has it’s own identifier.
16 - Windsock
Allows pilots to see what direction and strength of the wind. When the wind has blown them horizontal, most windsocks indicate that the wind is 25 knots or greater.
17 - Arrester Gear
See 12
18 - Control Tower
This building is centrally located on the airfield with good visibility of the whole airfield and the airspace around. The Control Tower houses various
controllers who control all aircraft, vehicular and pedestrian traffic. It also houses the communications and radar equipment used by the airfield.
Summary
• There are three main types of runway, the grass airfield, the triangular pattern runway and a main instrument runway. They each have their pro’s
and cons.
• A modern airfield has many elements which come together to keep it running smoothly.

If you have ever flown somewhere on holiday, before you flew you would have received a safety brief telling you what to do in case of an emergency. As an Air Cadet you will hopefully have the opportunity to fly in military aircraft. Each aircraft type has its own safety brief, which you will be required to watch before you board the aircraft. The following is about the safety briefing in a Grob Tutor training aircraft which is used for air experience flights nationwide.
The Safety Brief
• Much information is included in a pre-flight brief for the safety of the passenger.
• This information will include general information such as the aim of the exercise, the local flying area and weather conditions and other
information regarding the fitting and operation of parachutes, helmets and safety harnesses.
• Emergency actions will also be included in the brief together with precautions on the ground, especially in the aircraft manoeuvring area.
• You will be provided with safety equipment which will help you deal with any emergencies. Before flying you will need to make sure you know what this safety equipment is and how to use it. Here are some examples:
The Parachute
• This is used in case you need to abandon the aircraft.
• It consists of two leg straps and a chest strap as well as a yellow and black ‘D’ ring to deploy it.
• Ensure that the parachute is comfortable and fits correctly. If it doesn’t, let the ground crew know.
Life Preserver
• Used in Air Experience Flights near the coast, like RAF Woodvale.
• It inflates automatically when a cord is pulled and has a whistle, mirror, light and small radio beacon to attract attention.
The Safety Harness
• This is in the aircraft and consists of adjustable straps which are fitted into a quick release buckle.
• It stops you from falling out of you seat if the aircraft is inverted or performing aerobatics.
• Make sure your harness is as tight as possible. If it is uncomfortable, tell the ground crew before you take off.
Actions in an Emergency
• Emergencies in the tutor are extremely rare, but if an emergency does arise, stay calm and follow the pilot’s instructions.
• If you have to abandon the aircraft in the air, the pilot will shout ‘Jump, Jump’, at which point he will jettison the canopy. The canopy may need a
push to disengage the locking pins on it.
• To undo the safety harness simply press the yellow button and twist the buckle to either side. Then ‘dive’ off the wing. It will be very windy.
• Once out of the aircraft, deploy the parachute by pulling down on the “D” ring. It is important that once you have landed you undo the chest strap
before the leg straps in order to prevent you being dragged away by the parachute.
• If the pilot is unconscious you will need to control the aircraft yourself. First make sure the aircraft is straight and level. Then hold down the push to talk button on the control column and say ‘mayday, mayday’. Then release the button. Listen to the instructions from Air Traffic Control. Try and wake up the pilot if you can.
Summary
• If your squadron has it, watch the Grob Tutor Passenger Safety Briefing video.
• In an emergency stay calm and follow the pilots instructions.
• Listen to briefings carefully and know what to do in an emergency.

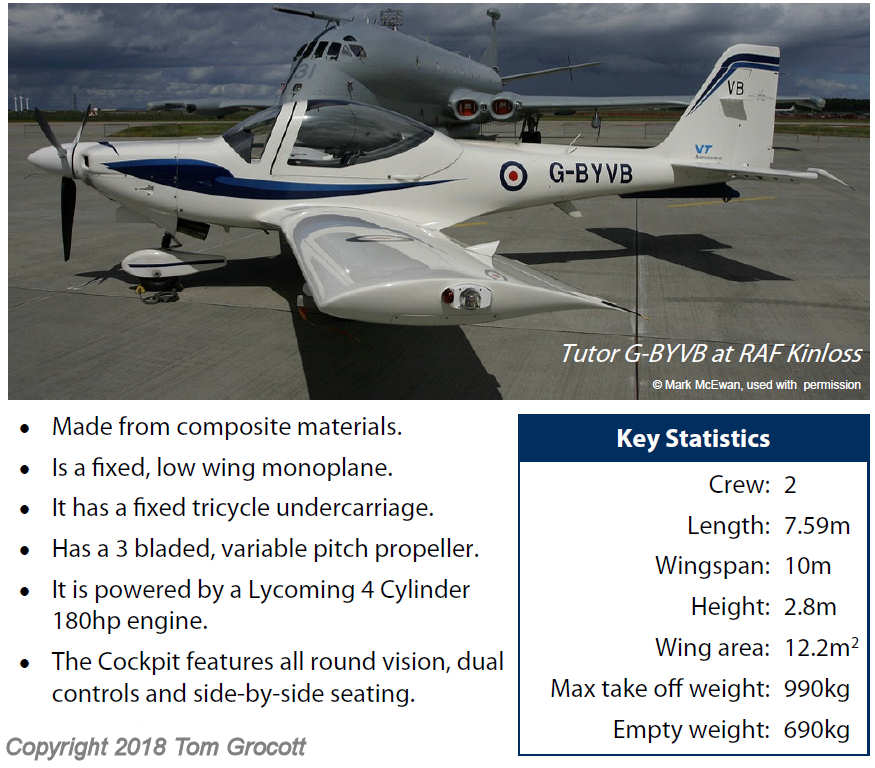
The Grob 115E Tutor aircraft is flown by 12 units throughout the country known as Air Experience Flights (AEF). It is also flown by University Air
Squadrons (UAS) which are often located with AEFs. The Tutor is built by Grob and entered service in the RAF in 1999.
• Made from composite materials.
• Is a fixed, low wing monoplane.
• It has a fixed tricycle undercarriage.
• Has a 3 bladed, variable pitch propeller.
• It is powered by a Lycoming 4 Cylinder 180hp engine.
• The Cockpit features all round vision, dual controls and side-by-side seating.
Controls
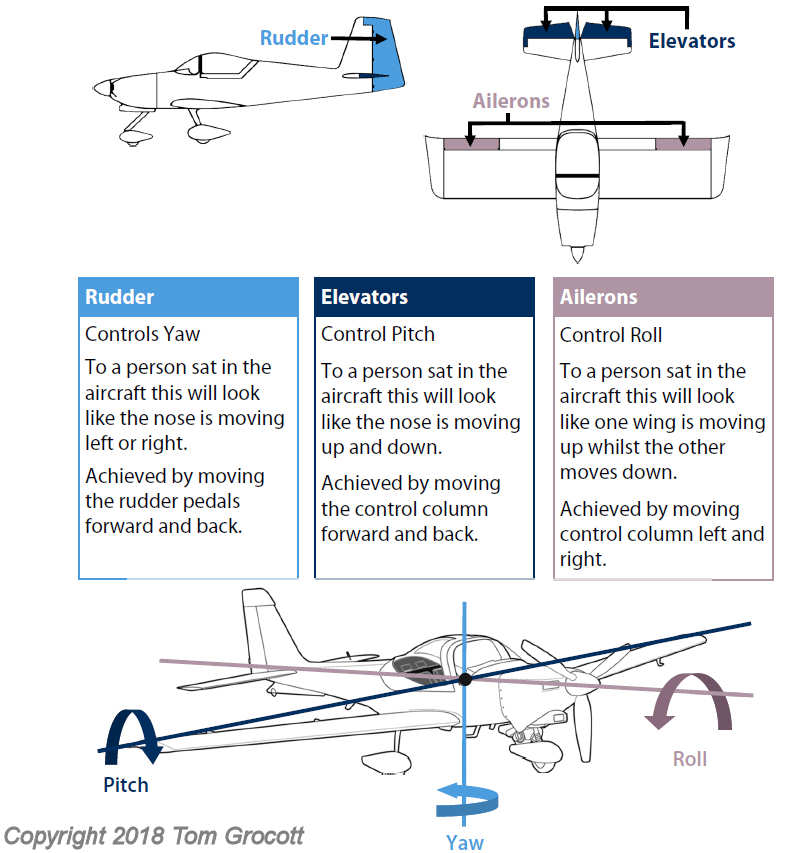
• The pilot controls the aircrafts pitch using the elevators, the roll using the ailerons and the yaw using the rudder.
• These control services are operated by the control column and the rudder pedals.
• Flaps may also be used to slow the aircraft on approach and to generate more lift on take-off.

The Viking
The Grob G103A Viking T1 makes up the majority of the RAF Air Cadet’s gliding fleet, based at Volunteer Gliding Schools (VGS) throughout the UK. The Viking has no motor, and to get it into the air it is winch launched. When it gets to the required height the cable is released.
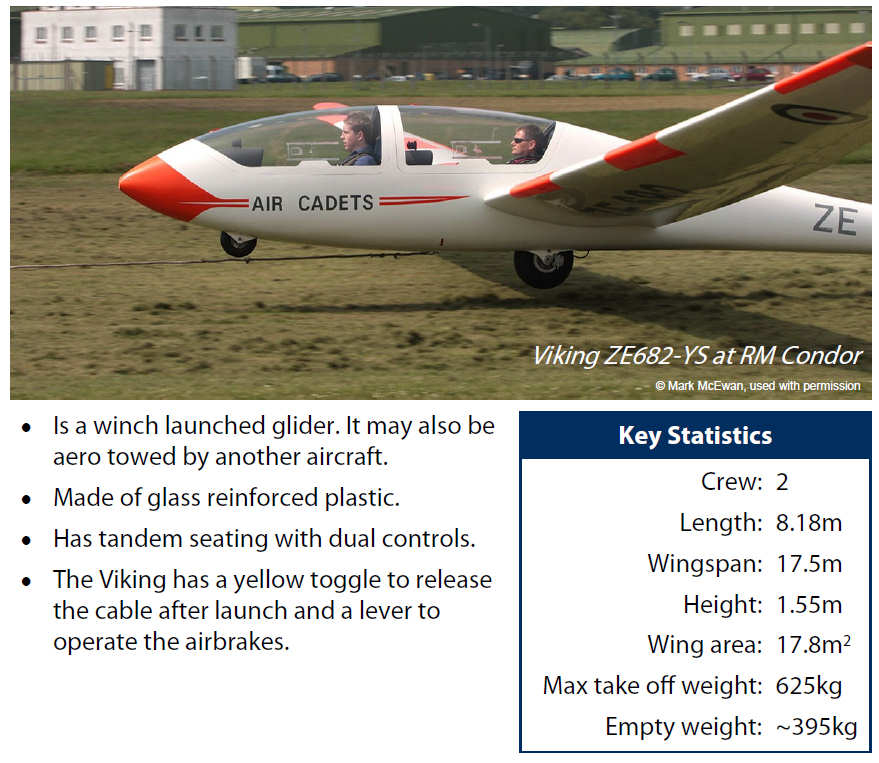
• The Viking is a winch launched glider. It may also be aero towed by another aircraft.
• Made of glass reinforced plastic.
• Has tandem seating with dual controls.
• The Viking has a yellow togg le to release the cable after launch and a lever to operate the airbrakes.
Controls
• Self-launched gliders have a conventional propeller which is used to get the aircraft airborne. With winch-launched gliders, however, a towing
cable connected to the aircraft is wound in quickly by a motor to pull the aircraft along the ground, producing lift.
• When the glider is airborne, the cable is then released and returned to earth with a small parachute to steady it.

When the steering wheel is turned in a car, the wheels turn left or right. In an aircraft its wheels are useless in the air so it’s movement is controlled by three control surfaces that can be found on the wings and the tail.

Winch Launching
The Viking glider has no engine so it cannot get airbourne by itself. One way it can get airborne is via a winch. A winch is a drum on which is wound about 1,500m of cable. The drum is turned by a powerful engine which the winch driver controls on the ground. Using this method, height gained is normally one third of the length of cable used and flights last between 6-10 minutes.
The Winch Launching Process
• The winch is sited on the upwind boundary of an airfield. The cable is then drawn out by a vehicle to the other side of the airfield, downwind of the winch.
• The cable is attached to the glider and the pilot checks there is no obstructions or hazards around the glider by asking the wingtip holder “All clear above and behind?”
• The pilot calls “Take up slack” which is passed to the winch driver by a signaller using lamps or large bats. One finger is raised.
• The winch driver slowly reels in the cable until it is tight.
• When the pilot is happy the cable is tight, the order “All Out” is given. The fingers are raised.
• After a short distance the glider becomes airborne. The glider climbs gently at first but then the climb quickly becomes much steeper and
height is gained rapidly.
• When the cable is around 70º from the ground the pilot releases it and begins gliding.
• The cable then falls to earth. A small parachute keeps the cable stable.
• It is winched back in by the driver, ready for the next launch.


